Tuesday, May 31, 2016

Tai O (HK)

Tai O is one of the many islands in HK that you have to take a ferry to get to. It doesn't take very long - about an hour or so - and there are several stops along the way. It really saddens me to see all the garbage that gets thrown into the water along the harbour, including styrofoam boxes (used for keeping fish, I believe) and lots of plastic bottles:

Styrofoam box on the rocks
Inside of the ferry waiting area
Outside, along the harbour

The main street is packed with food vendors, especially dried seafood stores, and as you continue on along the street, you encounter more and more houses that look as though they're about to crumble, squished between two newer houses or stores with no space in between them, as well as empty lots that were overgrown with plants. While the description sounds really bleak, I think these were absolutely beautiful.

Looking out from a dessert shop (doufu hua & black sesame)
End of the main street, looking back at housing
Breaking down, but beautiful in its own right.
And of course, stilt houses all along the shore. We walked into the streets, but I'm still not sure whether those areas are actually open to the public: they are houses after all.

Stilt houses
And even further along the path (we were the only tourists around), there was some incredibly beautiful scenery to be experienced:

I believe the copper-coloured building was for burning articles (as part of worshipping ancestors)
I wonder who lives in that complex?
Suffice it to say I was enchanted by Tai O. While part of me hopes it never changes, half the island already has higher rise buildings than the areas we walked around, and I'm not sure any amount of wishing will make those buildings stay where they are and leave the rest alone.

If You Miss The Plane I'm On... (Japan)

There are still a couple of rolls of film that have to be developed & printed since we didn't make it in time while we were in HK, but these give a pretty good idea of our stay in Japan, I think.

Beside Tokyo Skytree, the rail at night


Vending machine on our way home

Parking lot on our way home

We stayed in Tokyo for a couple of days at an airbnb, went off to Ito for a day (airbnb again), followed by Hakone for two days and one night (ryoukan), and then back to Tokyo for another two days (returning to the same airbnb), the second of which we left for Hong Kong.

The main street close to where we stayed in Ito
We went off on a day trip in Ito to do a walking tour and see the Jogasaki suspension bridge (which turned out to be about 10 paces to cross) and the surrounding area.
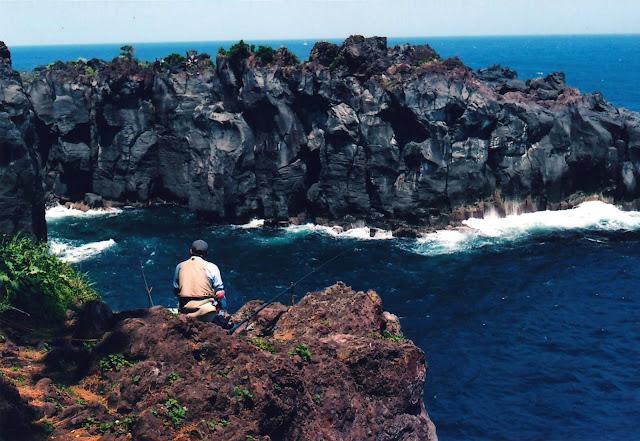
He's got guts!
Fisherman out there on the rocks! He wasn't the only one, either, although the other one had a ladder also.
It was about evening when we got back to the station (close to where we stayed), so we walked around the neighbourhood a bit more to get food, taking the chance to check out Orange Beach while we were there. I don't remember whether I had taken any photos of that particular stretch of road or not, since not all the film has been developed yet. A lot of the redscale photos also didn't turn out at all, which I'm pretty miffed about, though you can still make out some of them:

Redscale Film
Post offices were basically everywhere we went in Japan.
I'm not sure whether we just happened to notice them while we were in Japan, but we kept seeing post offices wherever we went! Which was great for me since I was sending out postcards, but I wonder if it's so much easier to send out mail/pick up mail because more people use the system than here in Canada? Or perhaps I simply don't use the post offices as much while I'm home (though if one didn't know to find them in Shopper's Drug Marts and the like, it might be pretty hard to locate one).


Redscale Film
A store along the street at night where we stayed

We did a LOT of walking in Ito & Hakone, mostly uphill (or at least I don't recall much downhill or even just walking on flat ground... it might be me selectively remembering the hikes, but I think it's pretty representative of our stay there).

Walking up to Moto-Hakone
Stone paths for most of the route
A marker along the path, though I'm not sure it's helping anyone anymore.

The walk up to amazake chaya was stunning! We were blessed with beautiful weather also, so the greens seemed all the more vivid. And all throughout the hike up along the stone paths, I got the feeling I could understand how some of the lovely scenery from the Miyazaki films came about. It'd probably do wonders for my health if I could do that hike every day!

Our destination: amazake chaya
We had our doubts and were tempted a couple times to wait for the bus instead on our hike up, but we ended up walking the entire way to amazake chaya, where the snacks & drinks we ordered disappeared so quickly I had no time to take a picture of them. I don't know if everything tasted better because we had been walking so long, but everything was lovely, from the atmosphere (minus the endless bugs) to the food to the staff. We did take the bus back to our ryoukan though, which was very close to Gora Park.

The vividness of the plants was stunning
The second day, we took a trip to Gora Park (above) and Le Petit Prince museum (below). The museum was darling, and had a bunch of figures of the characters the little prince met on his journey, and at the end, of course, a souvenir shop. There was also a restaurant that we didn't end up trying, but everything just fit together so incredibly well!

Le Petit Prince restaurant inside the mostly open-air museum in Hakone
On our way back to Tokyo that day, we stopped by to see the Odawara castle, where I saw these adorable little guys:

Tiny little offshoots coming out from tree bark!
Try to recognize those next time you go!

Another instalment of photos to come for Hong Kong & Macau.

Monday, May 30, 2016

Chevron Cardigan, Finally.

It's been done for a while now! Long enough to stain a shirt!

Am I even still knitting? Is that a thing?

This took way too long. Even longer to get pictures done.

The button bands have been done for a while and were just waiting to be soaked and blocked to length, before being sewn onto the fronts (see more below), and the neckline (picked up and knitted up) took all of maybe an hour, and that was with 3 failed impromptu attempts. But I finally hunkered down and did the whole sewing of the button bands to the fronts in a day, as well as improvising the neckline because I had run out of buttons and couldn't just knit it straight up.


Perfect fit. Except the arms could have maybe 1-2" more ease.

It's a hot pink-verging-on-red cardigan/bomber jacket-cardigan thing, and I think it will fit very well into my wardrobe (or any wardrobe, really, because this colour would likely go with precisely nothing in particular). I love it. But there are a couple of things I already want to change:
  1. WHY DOES THE PATTERN HAVE NO POCKETS? And why did I not think to add them along the way? I realized this little dilemma after I had sewn the body together & tried the thing on to make sure it fit the way I wanted it to - which it did - only to reach down... and find that there was nowhere to place my hands. I guess I'll have to awkwardly hold them beside my body now like a regular person and try not to fidget all day long. So here's my advice to you, if you're considering making this cardigan: add pockets. I would probably make slanted pockets, but that doesn't seem like such a great option right now because it would interfere with the chevron pattern, so maybe even just vertical slit pockets 1/4 of the way into the fronts from the side seams. As it stands, I might just steek pockets into the fronts.
  2. For the button bands, I would definitely have just cast on those stitches at the bottom of the fronts & put those stitches on hold. There's really no advantage that I can see with sewing completely separate bands onto the fronts.
  3. I might even go so far as to say don't bind off the button bands at the top, instead knitting across while simultaneously picking up the neckband stitches. That way you'll get a smooth transition into the neckband. As it was, I had cut the yarn, so I ended up picking up half the stitches of the button bands, every stitch at the front neck & back neck until the curve started, where I picked up 3/4 of the stitches. Also, along the back, where the shoulder seams are, I only picked up 2 stitches for the first & last 4 bind off stitches. Then 1x1 ribbing up approximately 12 rows, complete with BO 1 at front edges 6 rows before the end, BO 1 & dec. 1 at each front edge, then BO 3 sts, then the final row was just BO all sts. That gave me the curved top of the neckband.


Dark spot of shame: remember to remove your buttons before long soaks!

So in addition to stashbusting this madtosh dk (67g remain), I also stashbusted with the buttons! (Obvs. Just look at how I had to alternate.) I was waffling between these and wooden buttons, but because it turned out more of a cardigan than a coat/jacket, alternating between these two types won out. And as you can see, I clearly ran out and had to use another one that's gold/black and fit in well enough with these two other ones. I think it turned out pretty well!

And of course, my previous rant about this madtosh bleeding scenario. The black that bled out of the buttons seems like it's here to stay. And I'm still not sure whether I can wear this with anything light in colour. Or anything that is any other colour. Which is a pity, because this would look amazing with white.